マクロ撮影のコツとテクニック
広告
の世界に入る マクロ撮影の方法 それはまるで、自分の家の裏庭に隠された宇宙を発見するようなものだ。必要なのはレンズだけではなく、視点の転換と光の扱い方を熟知することだ。
技術的な正確さと芸術的な忍耐力をバランスよく組み合わせることで、ありふれた質感から、自然界の最も複雑で目に見えない細部までをも明らかにする、非凡な等身大の肖像画を生み出すことができる。

専門家の技術概要
- 1対1の繁殖比率、つまり「実物大」の基準を定義する。
- 機材選びのポイント:延長チューブ vs. 専用ガラスレンズ。
- 極めて浅い被写界深度の物理現象を制御する。
- 失われた環境光子を補うための人工照明戦略。
- フォーカススタッキング:デジタル技術による画像全体の鮮明化への架け橋。
マクロ撮影とは何か?そして、なぜ倍率が重要なのか?
真のマクロ撮影は、標準的な「クローズアップ」撮影の限界を超えたところから始まります。具体的には、被写体の物理的なサイズがカメラのセンサー上での占有面積と一致する、1:1の等倍撮影です。
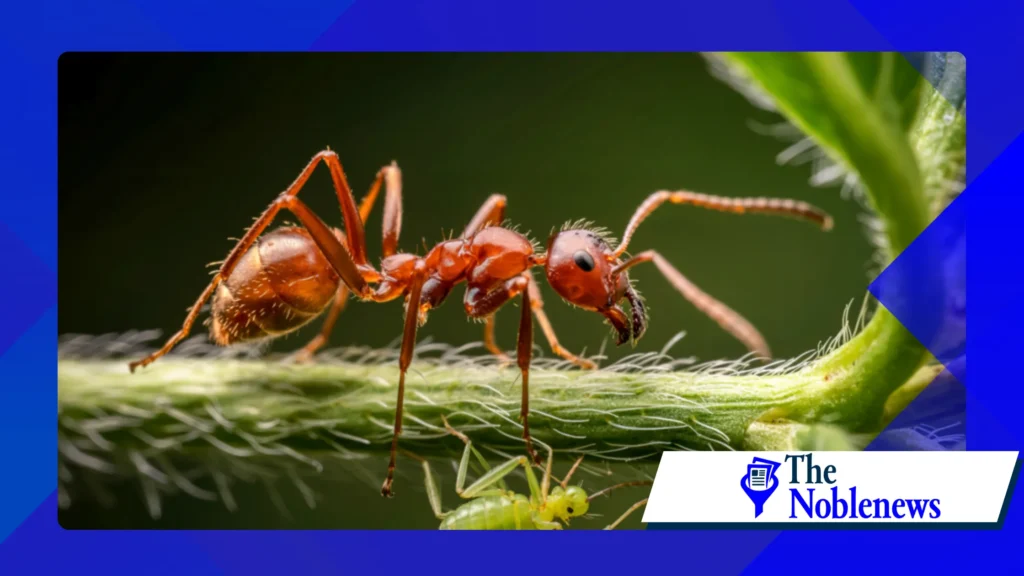
もし、野生で体長がちょうど5mmの小さなハエトリグモが、あなたのフルサイズセンサー上で5mmを占めるなら、あなたは最高の倍率を実現したと言えるでしょう。
多くのメーカーは、倍率が1:3程度のズームレンズに「マクロ」というラベルを付けていますが、これは顕微鏡レベルのディテールを期待する初心者にとってよくある不満点です。
これらの技術的な比率を理解することは非常に重要です。なぜなら、1:1の比率ではあらゆる振動が増幅され、光学の法則が肖像画や風景画とは異なる振る舞いをするようになるからです。
機器の選択はマクロ栄養素の測定結果にどのような影響を与えるのか?
必ずしも$1,500レンズが必要なわけではありません。エクステンションチューブ(カメラとレンズの間に挟む中空のスペーサー)を使えば、レンズを「だまして」より近い距離にピントを合わせることができるからです。
しかし、専用のマクロレンズ(一般的に90mmから105mm)は、快適な「作動距離」を提供します。これは、レンズ前面と、神経質な昆虫との間に文字通り呼吸できる程度の距離があることを意味します。
2026年までに、ミラーレスカメラの内部手ブレ補正機能と20倍拡大の電子ビューファインダーの登場により、マニュアルフォーカスはデジタル一眼レフカメラ時代に比べてはるかに勘に頼る必要がなくなるだろう。
重厚な三脚は、多くの写真家にとって欠かせない道具であり続けている。焦点面が紙のように薄い場合、脈拍でさえ完璧に構図された写真を台無しにしてしまう可能性があるからだ。
どのカメラ設定が最高の鮮明度を確保しますか?
この極小の世界では、被写界深度が非常に浅いため、蜂の目は鮮明に写っているのに、羽は完全にボケでぼやけてしまう、といったことが起こり得る。
絞りをf/22まで絞るのは論理的な解決策のように思えるが、これは通常「回折」を引き起こし、光波が散乱して、維持しようとしている解像度そのものを実際に低下させてしまう。
ほとんどのプロはf/8またはf/11付近を「最適な絞り値」と見なし、フォーカススタッキングソフトウェアを使用して複数のフレームを合成し、画面全体にわたってシャープな、あり得ない傑作写真を作り出すことを選択する。
続きを読む: より速く、より良い写真レタッチのための編集ワークフローのヒント
高速オートフォーカスは忘れてください。蝶の口吻にピントを合わせたいのか、触角にピントを合わせたいのかをオートフォーカスが判断することはほとんど不可能なので、正確な撮影には手動調整が唯一確実な方法です。
| 特徴 | 初心者向けセットアップ | プロによるセットアップ |
| レンズの種類 | キットレンズ+延長チューブ | 100mm f/2.8 専用マクロレンズ |
| 集中する | シングルポイントオートフォーカス | マニュアルフォーカス+レールシステム |
| 点灯 | 自然光/拡散板 | ツインフラッシュ(カスタムスクリム付き) |
| 安定性 | IBIS搭載の手持ち式 | カーボンファイバー三脚+雲台 |
マクロ撮影において、照明が最大の課題となるのはなぜか?
物理的に近づくと、文字通りの日食のような現象が起こります。撮影のために被写体に近づくと、レンズの鏡筒が太陽を遮り、被写体がぼんやりとした魅力のない影の中に埋もれてしまうことがよくあります。
動きのブレを抑えるために絞りを狭くしたり、シャッタースピードを速くしたりすることが多いため、センサーへの光量が不足しがちになり、高感度ノイズが常に発生して、画面がざらざらとした印象になる。
専用のリングフラッシュは影のない、無機質な光を提供するが、多くのアーティストは、被写体に立体感とドラマチックな存在感を与えるために、方向性のある影を作り出すことができる「ツインフラッシュ」方式を好む。
よりソフトなタッチを好む方には、 演色評価数(CRI) LEDパネルは、被写体を驚かせるような強い「光」を発することなく、自然光を再現できる。
野生環境でマクロ撮影を成功させる方法
屋外マクロ写真家は、本質的には小さな巨人をストーキングするようなもので、風が収まるのを待つ間、瞑想に近いほどの忍耐力が求められる。
早朝は、この商売の秘密兵器だ。冷たい空気は昆虫の代謝を遅らせ、しばしば昆虫は動かずにじっと動かなくなり、見事な天然の露のしずくを身にまとっている。
カメラのセンサーを被写体と完全に平行に配置する、いわゆる「フィルム面」テクニックは、実際に利用できるわずかな被写界深度を最大限に活用するための最も効果的な方法です。
倫理的な配慮はここで最も重要です。昆虫を冷やしたり、特定のポーズを取らせたりすることは、私たちが記録している繊細な生態系を破壊するため、専門家の間では好ましくない行為とされています。
マクロ撮影後の最適な処理手順は何ですか?
2026年のポストプロダクションは、ミスを修正することよりも、高度なAI支援によるフォーカス合成を通じて、1回の撮影で表現できる限界を広げることに重点が置かれるようになるだろう。
色収差、つまりコントラストの高いエッジに現れる目障りなマゼンタ色のフリンジには注意してください。これらは被写体の周囲で拡大され、プロが撮影した写真もあっという間にアマチュアっぽく見えてしまう可能性があります。
お好みの編集ソフトで「シャープネス」ではなく「テクスチャ」を適用すると、過剰な処理による「パリパリとした」デジタルアーティファクトを加えることなく、個々の花粉粒を際立たせ、より自然な結果が得られることが多いです。
こちらをお読みください: 映画の特殊効果の背後にある科学
トリミングを恐れないでください。今日の50メガピクセル以上のセンサーを使えば、「写真の中に写真がある」ような発見ができ、ファインダーを覗いているだけでは気づかなかったディテールを見つけることができるでしょう。
最終的な考察
ニュアンスをマスターする マクロ撮影の方法 それは、写真家に立ち止まって「目に見えない」世界の複雑さをじっくりと味わうことを促す、変革的な体験である。
この分野での成功は、高価な機材を揃えることとはめったに関係ありません。重要なのは、倍率、光、そして決定的瞬間を捉えるために必要な身体的な安定性という、繊細なバランスを理解することです。
練習を重ねるほど、適切な視点さえあれば、ありふれた裏庭の庭園にも、異国のサファリに匹敵するほどの視覚的なドラマが秘められていることに気づくでしょう。
光の物理学とそれが現代のガラス要素とどのように相互作用するかについてさらに深く掘り下げるには、 B&H Explora公式写真ガイド さらなる学習のための包括的な技術ライブラリを提供します。
FAQ: よくある質問
マクロ撮影にはフルサイズカメラが必要ですか?
実際、クロップセンサー(APS-C)は、フルサイズセンサーに比べてより広い画角とわずかに深い被写界深度が得られるため、しばしば好まれる。
スマートフォンでマクロ撮影はできますか?
最新のスマートフォンには素晴らしい「マクロモード」が搭載されているものの、使用されているセンサーは非常に小さいため、専用のマクロレンズが持つような滑らかな背景のぼかしや、高解像度を再現することはできない。
マクロ撮影に最適な時間帯はいつですか?
日の出後最初の1時間は、黄金色の色合いが美しいだけでなく、風がなく昆虫が「眠っている」状態であるため、撮影に最適な条件が揃うので、最も良い時間帯と言える。
マクロ撮影には三脚が必須ですか?
花や静止した被写体を撮影する際には非常に有効だが、動きの速い昆虫を撮影する場合、多くのプロは強力なフラッシュを使って手持ちで撮影し、動きを止める。
++ マクロ撮影のコツ:息を呑むようなクローズアップ写真を撮る方法
++ マクロ撮影のコツ